
在听完cs106l的课后,终于迎来了最期待的hashmap的作业
我做的是https://web.stanford.edu/class/archive/cs/cs106l.1214/hashmap.html?utm_source=chatgpt.com这里的,这个作业老师的完成度不高,也就是说自己动手的空间会更多。
它提供了4个里程碑和扩展,我就不一一说了,迭代器这个扩展不做应该就不算很难。
让我们先简单介绍下hash表。
在hash表中,对于每一个key,我们通过某个hash的方法,将key转化为数字,这时候将其对桶数进行取余,将其放到对应的桶中,但若是多个key进行hash后在同一个桶,这就是产生了hash冲突,我们就通过链表来连接,让它们能存在于一个桶中,之后我们要查询某个,只需要给出key,得到它的hash值后,到对应的桶中去寻找即可,实现O(1)的时间复杂度,但随之而来也有个问题,若是全部key都堆在一个桶,那么查询的速度就退化到了O(n),这就不是我们期望的,因此我们引入负载因子,负载因子为存储元素的个数 / 桶数,意味平均每个桶储存多少元素,若是达到我们设置的负载上线后,就进行rehash来重新分配,也就是重新设置个更大的桶数,对于每一个key再次rehash然后分配到对应的桶里去。
当然负载因子无法完全避免hash冲突,毕竟是看平均在全部桶的个数,在stl中,unordered_map的实现里,max_load_factor设置为1,在超过时会渐进式的rehash,也就是分散的执行,也就是在每次你insert、find等操作时,顺便rehash一小部分,悄无声息的完成rehash,当然这个无法完全避免hash冲突,若是10个桶你存了3个元素,这3个元素都在一个桶里,时间复杂度也是退化到了O(n)。
hashmap设立了模板
template<typename K, typename M, typename H>
分为对应key、value和hash函数
rehash
这是里程碑1的内容,让我们实现rehash
在上面我们讲到了rehash的意思,很简单就是对每一个元素的key进行hash然后再取余放到对应的桶里,而每个桶我们存放的是链表,因此就是将每一个链表节点放到对应的桶。
using value_type = std::pair<const K, M>;

struct node
{
    value_type value;
    node* next;
};

std::vector<node*> _bucket_array;

using bucket_type = decltype(_bucket_array);(用using bucket_type = std::vector<node*> 一样)

rehash(size_t new_bucket_count)
{
    if (new_bucket_count == 0)
    {
        throw std::out_of_range("HashMap<K, M, H>::rehash: new_bucket_count must be positive.");
    }

    bucket_type new_bucket(new_bucket_count, nullptr);
    for (auto head : _bucket_array)
    {
        auto cur = head;
        while (cur)
        {
            auto next = cur->next;
            const auto& key = cur->value.first;
            size_t new_bucket_idx = _hash_function(key) % new_bucket_count;
            cur->next = new_bucket[new_bucket_idx];
            new_bucket[new_bucket_idx] = cur;
            cur = next;
        }
    }
    _bucket_array = std::move(new_bucket);
}
这就完成了一次rehash的实现,当new_bucket_count为0时就抛出异常,表示参数不好,需要大于0。
代码的时候就是依次的看过去然后放到对应的桶里,我没实现渐进式的,这是一次性完成的。
在里程碑2中我们要实现操作符:[]、<<、==和!=,并且修改函数让它符合const规范。
operator[]
[]操作简单,即为收到一个key,然后hash后到对应的桶里去寻找,若是能找到则返回对应的value,若是找不到则插入一个新的[]。
M& operator[](const K& key)
{
    size_t bucket_idx = _hash_function(key) % _bucket_array.size();
    node* cur = _bucket_array[bucket_idx];
    while (cur)
    {
        if (cur->value.first == key)
        {
            return cur->value.second;
        }
        cur = cur->next;
    }
    return insert({key, {}}).first->second;
}
这里我们用一个insert,接下来让我们实现insert:
pair<value_type*, bool> insert(const value_type& value)
{
    const auto& key = value.first;
    size_t bucket_idx = _hash_function(key) % _bucket_array.size();
    node* cur = _bucket_array[bucket_idx];
    while (cur)
    {
        if (cur->value.first == key)
        {
            return {&(cur->value), false};
        }
        cur = cur->next;
    }
    node* new_node = new node{value, _bucket_array[bucket_idx]};
    _bucket_array[bucket_idx] = new_node;
    ++_size;
    return {&(new_node->value), true};
}
在operator[]中,我们往insert中传入的是{key, {}},第二个{}就是初始化,等同于M()或者M{},因为我们要在这个key然后创建一个新的M,此时的M我们不知道,所以通过默认构造来得到。
operator<<
operator<<简单的,我们通过创建一个友元函数,如果放在成员函数里那就是如果你想cout,就不是cout << HashMap而是HashMap << cout了。
friend std::ostream& operator<<(std::ostream& os, const HashMap& map)
{
    os << "{";
    bool first = true;
    for (auto head : map._bucket_array)
    {
        auto cur = head;
        while (cur)
        {
            if (first)
            {
                first = false;
            }
            else
            {
                os << ", ";
            }
            os << cur->value.first << ":" << cur->value.second;
            cur = cur->next;
        }
    }
    os << "}";
    return os;
}
注意我们是往os里<<,这里用了一个外部的bool来判断该值是否为第一个。
operator==
我们先检查两个HashMap的元素个数是否一样,若一样再通过历遍一个hashmap,然后看另一个hashmap中是否有该节点,只要有一个不符就返回false,若是都符合则返回true,实现起来也简单,走到一个节点,拿key然后hash,接着去看另一个hash表对应的桶里是否有该节点即可。
operator!=
实现就是返回return !(lhs == rhs)即可
const
在给出的函数中,at函数要返回一个const的,那就是给出的基础上在函数右边加个const,表示这个成员函数不会修改成员变量,然后返回const M&就可以了。
里程碑3让我们实现拷贝构造、拷贝复制、移动构造和移动赋值
拷贝构造
在我们构建新的HashMap是使用,类似HashMap new(old)或者HashMap new = old。
我们尽量使用初始化成员列表来加快速度:
HashMap(const HashMap& other)
: _size(0),
  _hash_function(other._hash_function),
  _bucket_array(other._bucket_array.size(), nullptr)
{
    for (auto head : other._bucket_array)
    {
        auto cur = head;
        while (cur)
        {
            insert(cur->value);
            cur = cur->next;
        }
    }
}
这里我们_size,也就是列表中元素的格式,我们要初始化为0,因为insert的时候会++_size,同时注意不能忘了初始化为0,若是忘了初始化_size,它里面是垃圾值,那就会出问题。
拷贝赋值
也就是不是新的,然后copy了旧的,类似:HashMap new; new = old;
HashMap& operator=(const HashMap& other)
{
    if (this == &other)
    {
        return *this;
    }
    clear();
    _size = 0;
    _hash_function = other._hash_function;
    _bucket_array.assign(other._bucket_array.size(), nullptr);
    for (auto head : other._bucket_array)
    {
        auto cur = head;
        while (cur)
        {
            insert(cur->value);
            cur = cur->next;
        }
    }
    return *this;
}
我们需要先检查是否是相同的HashMap,避免clear了自己(HashMap a; a = a),若不是再clear了原先的hashmap,然后继续插入,然后返回这个即可。
接下来是clear,在clear中,我们需要历遍每个桶的每一个节点,因为是new出来的,因此通过delete来避免内存泄漏。
clear()
{
    for (auto& head : _bucket_array)
    {
        auto cur = head;
        while (cur)
        {
            auto next = cur->next;
            delete cur;
            cur = next;
        }
        head = nullptr;
    }
    _size = 0;
}
这里通过&历遍是因为最后我们设置了head = nullptr,避免悬空指针。
移动构造
HashMap(HashMap&& other) noexcept
: _size(other._size),
    _hash_function(std::move(other._hash_function)),
    _bucket_array(std::move(other._bucket_array))
{
    other._size = 0;
}
这就很简单了,直接把别人那的拿来就好,这里加个noexcept,表示我保证这个不会抛出异常,这样能避免编译器保守的选择copy,那移动的效果就没了。
这里将other的元素数设置为0,代表里面已经空了,避免跟_size相关的受到影响,如:
test.size() 然后size返回的是_size,若是不设置为,test.size()得到的非0,会给出错误的影响。
移动赋值
HashMap& operator=(HashMap&& other) noexcept
{
    if (this != &other)
    {
        clear();
        _size = other._size;
        _hash_function = std::move(other._hash_function);
        _bucket_array = std::move(other._bucket_array);
        other._size = 0;
    }
    return *this;
}
在确定另一个不是当前这个后才clear,避免 HashMap a; a = a;这样,会出现问题。
好耶~,hashmap做完了….吗?
接下来才是重头戏,让我们实现迭代器。
在最开始写迭代器我是一头雾水,想了很久,最后想明白了,迭代器就是一个类,该类有递增、解引用、==等。
同时我们实现迭代器时,需要该迭代器对应的HashMap,那么就要将迭代器A和HashMapA绑定起来,因此通过一个模板参数,该迭代器是哪个HashMap的?传进来的那个。
同时我们迭代器的实现需要包括const迭代器和非const迭代器,那么我们设置第二个模板参数,该参数的true对应const,false对应非const
template<typename Map, bool IsConst>
class HashMapIterator
接下来让我们思索一下该迭代器需要哪些成员变量,迭代器就是指向HashMap中的某个节点,那么我们就要知道该迭代器在哪个桶,在哪个桶里的哪个节点,同时为了能历遍桶,我们还需要桶的数组,同时我们用一个_map来储存对应的HashMap指针,这样方便在后续的比较中直接看绑定的HashMap是怎么样的,同样的,因为我们有了_map,那么桶数组直接通过_map来得到即可。
你可能会想既然存了_map,那么还要template里的Map做什么,如果没有Map,_map的这个Map*你也得不到,所以不能少的。
那么就很简单,3个成员变量。
一个当前在哪个桶,_bucket_idx
一个当前在哪个节点,_node
一个记录绑定的HashMap的指针,_map
    using node = typename Map::node;
    using bucket_type = typename Map::bucket_type;

    private:
    size_t _bucket_idx;
    node* _node;
    Map* _map;
记得在HashMap里friend一下HashMapIterator哦。
那么接下来让我们实现成员函数:
首先是++,我们知道有++i和i++的区别,在成员函数中都是++,区别是++i的参数中不用int,i++的参数中需要int,让我们实现一下
    HashMapIterator& operator++()
    {
        if (_node == nullptr)
        {
            return *this;
        }
        if (_node->next == nullptr)
        {
            for (auto start = _bucket_idx + 1; start < _map->_bucket_array.size(); ++start)
            {
                if (_map->_bucket_array[start])
                {
                    _bucket_idx = start;
                    _node = _map->_bucket_array[start];
                    return *this;
                }
            }
            _bucket_idx = _map->_bucket_array.size();
            _node = nullptr;
        }
        else
        {
            _node = _node->next;
        }
        return *this;
    }
若是当前节点为_node,就代表已经走到头了,直接返回该迭代器就好
如果没有,则看下一个,若是下一个不为空,则直接走,若为空那么从下一个桶开始找第一个不为空的桶
若是所有桶都历遍完没有遇到不为空的桶,那么将_node置为nullptr,_bucket_idx置为桶的大小
++i这里返回的是&,因为返回的是已经递增后的迭代器,对于它的修改都应该被应用。
若是i++,那么返回的应该是一个copy的迭代器,真实的迭代器已经走到下一个去了。
    HashMapIterator operator++(int)
    {
        HashMapIterator old = *this;
        ++(*this);
        return old;
    }
递增的做好了,接下来是完成==、!=
对于==,因为每个迭代器都绑定这一个HashMap,那么最开始比较的就是绑定的HashMap是否相同,若是相同,节点是否相同。
    friend bool operator==(const HashMapIterator& lhs, const HashMapIterator& rhs)
    {
        return lhs._map == rhs._map && lhs._node == rhs._node;
    }
理论上用成员函数是没差的,但为了符合规范,==就放在外面用友元了
!=号同理
    friend bool operator!=(const HashMapIterator& lhs, const HashMapIterator& rhs)
    {
        return !(lhs == rhs);
    }
到了现在,我们实现了++、==和!=,我们还要实现解引用、->。
解引用时我们需要返回当前节点对应的value,对于指针的->,我们需要返回该value的的地址,编译器会对这样进行转化,如it->val会转化为(it.operator->())->val,这样就能正确的进行。
using value_type = typename Map::value_type;接下来就是编写解引用、指针的代码了。
    value_type& operator*()
    {
        return _node->value;
    }

    value_type* operator->()
    {
        return &(_node->value);
    }
这里我没有设置检查_node是否为空指针,为了效率,信任使用者(才不是因为懒)
在这里我们实现了解引用和->,接下来我们来实现构造函数,对于构造一个迭代器,我们需要向其传入什么?它所需要绑定的HashMap,_node在的地方(也就是begin和end)。
让我们把构造函数放在private里,让它无法直接被构造出来,只能间接的通过HashMap来实现构造,这时候我们需要friend Map,让HashMap能调用该构造函数。
    friend Map;

    HashMapIterator(map_ptr map, size_t des)
    :   _map(map),
        _bucket_idx(map->_bucket_array.size()),
        _node(nullptr)
    {
        if (des == 0)
        {
            for (size_t i = 0; i < map->_bucket_array.size(); ++i)
            {
                if (map->_bucket_array[i])
                {
                    _bucket_idx = i;
                    _node = map->_bucket_array[i];
                    break;
                }
            }
        }
    }
然后我们接下来就在HashMap中实现begin和end,获取到迭代器:
iterator begin()
{
    return iterator(this, 0);
}

iterator end()
{
    return iterator(this, 1);
}
这里的返回我们用了iterator,iterator我们需要现在HashMap中定义,你是否注意到了,我到现在只在开头的迭代器讲了一嘴const迭代器,我们到现在,上面的实现都是非const的,在==、!=中也只能比较const和const或者非const和非const,接下来让我们步入const指针的世界:
C++ 规则是:const 对象只能调用 const 成员函数(重要)
因此编写const相关的函数,我们都要加个const
在HashMap中,我们使用iterator和const_iterator这两个命名是为了符合stl规范
using iterator = HashMapIterator<HashMap, false>;
using const_iterator = HashMapIterator<HashMap, true>;
增加两个返回:
const_iterator begin() const
{
    return const_iterator(this, 0);
}

const_iterator end() const
{
    return const_iterator(this, 1);
}
同样的面对Map*,存在const Map*和Map*,因此也要做出区分
using map_ptr = std::conditional_t<IsConst, const Map*, Map*>;
map_ptr _map;
接下来让我们回头看HashMapIterator,我们为了让它符合stl规范,我们看看需要加什么:
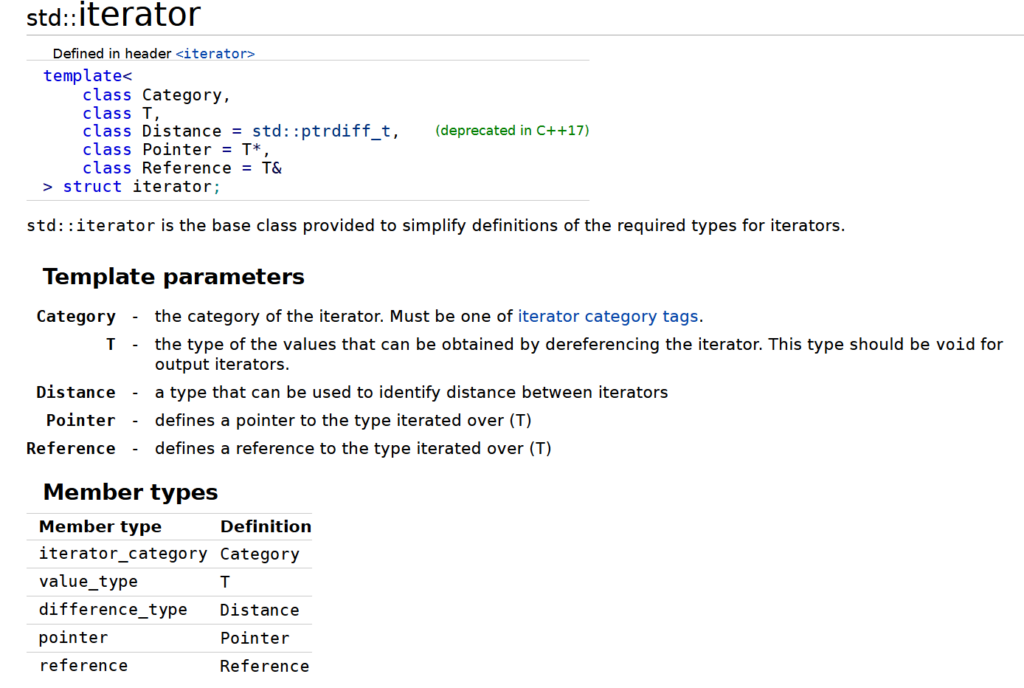
通过查阅cppreference,我们得知需要:iterator_category、value_type、difference_type、pointer、reference。
iterator_category即为迭代器的种类,我们这个差不多是前进迭代器
value_type就是我们这个,对应的键值对
difference_type,迭代器间距离的单位,我们通常用ptrdiff_t即可
pointer,指针,就是我们上面返回的value*
reference,引用,就是value&
接下来让我们把它填进去,让它符合stl的规范,这里我用 conditional_t,来控制const、非const所返回的pointer和reference是否为const的
const和非const的迭代器的区别就是是否能修改它们所指向的值,那么就修改reference、pointer即可,operator++它们都共用的。
    using value_type = typename Map::value_type;
    using pointer = std::conditional_t<IsConst, const value_type*, value_type*>;
    using reference = std::conditional_t<IsConst, const value_type&, value_type&>;
    using difference_type = std::ptrdiff_t;
    using iterator_category = std::forward_iterator_tag;
接下来就是修改函数的返回值
reference operator*()
pointer operator->()
接下来是比较,我们这里规定了比较的双方HashMap和IsConst必须相同,那么就只能const和const,非const和非const进行比较,让我们将其能通用。
template<typename Map_, bool B1, bool B2>
friend bool
operator==(const HashMapIterator<Map_, B1>& lhs, const HashMapIterator<Map_, B2>& rhs)
{
    return lhs._map == rhs._map && lhs._node == rhs._node;
}

template<typename Map_, bool B1, bool B2>
friend bool
operator!=(const HashMapIterator<Map_, B1>& lhs, const HashMapIterator<Map_, B2>& rhs)
{
    return !(lhs == rhs);
}
同时为了避免const const_iterator的出现,我们还需要对解引用、指针进行修改,添加const,让const const_iterator能正常的使用,也就是避免 const HashMap::const_iterator a = xxx; *a;
若是出现这种情况并且成员函数中没有const,编译器就无法找到适合它的函数。
    reference operator*() const
    {
        return _node->value;
    }

    pointer operator->() const
    {
        return &(_node->value);
    }
基本上完成了,现在就差非const到const的转换,这是很常见的一种行为,比如一个表前半段是可以被修改的,但是后半段是很重要不能被随意修改的,那么当历遍到中间时,将迭代器转为const迭代器,这样就能防止被修改。
    template<bool B = IsConst, typename = std::enable_if_t<B>>
    HashMapIterator(const HashMapIterator<Map, false>& other)
    :   _map(other._map),
        _bucket_idx(other._bucket_idx),
        _node(other._node)
    {}
这里我们借用编译器会自己寻找最适合的函数和enable_if_t来实现非const到const的转换。
template<bool B, class T = void>
struct enable_if {};            // B=false:没有 member type

template<class T>
struct enable_if<true, T> {     // B=true:有 member type
  using type = T;
};

template<bool B, class T = void>
using enable_if_t = typename enable_if<B, T>::type;
这是enable_if_t的实现原理,若是B为false,那么会跳到上面的enable_if去,其中并不存在type,若是B为true,那么会走到下面的type,此时就存在type,enable_if_t就是省去了我们写enable_if::type的功夫。
那么我们该怎么利用编译器会自己寻找最适合的函数这一点来实现非const到const的转化呢?
我们通过在模板中另typename = enable_if_t<B>来进行,若是B为false,该无法正确执行,此时编译器不会选择执行该函数,若是是,那么type存在,typename = type,这里的typename =,我没有给它名字因为它的功能就是负责筛选的,你让它typename t = 也是可以的。
那么其他的都跟普通的构造实现一样:
    template<bool B = IsConst, typename = std::enable_if_t<B>>
    HashMapIterator(const HashMapIterator<Map, false>& other)
    :   _map(other._map),
        _bucket_idx(other._bucket_idx),
        _node(other._node)
    {}
注意哦,此时我们读取了非const迭代器的成员变量,我们需要提前先friend一下,让它们成为好朋友,也就是:
friend class HashMapIterator<Map, !IsConst>;这里直接!IsConst就行了,这样就会跟另一个成为好朋友,不用true和false都写。